Translation:
Resources:
Life as a WordPress blogger has become remarkably easy. If you can hold a mouse and follow instructions then you’re most of the way towards carving out your own niche on the internet. A fresh installation gives you a powerful and attractive system with minimal effort, and with a little luck you can be blogging in under half an hour.
Despite the availability of hundreds of themes, and the general goodness of the default Kubrick theme, sometimes you just want to give your blog that personal touch, and the only way to do this is by going under the hood and having a look around.
A month in to running a WordPress-based website and I find myself doing the very same thing. None of the themes were exactly what I was looking for, and after investigating the internals of WordPress I realised it was a lot more involved than it initially appeared. I could certainly imagine a beginner being overwhelmed by the mass of acronyms and incongruent technologies.
With this in mind I decided to write a guide that would help not only myself, but might also help others who have been put off trying to experiment with WordPress. I make no claims of being a style guru and will rely on common sense and basic design principles.
In writing this I will assume a rudimentary knowledge of HTML and CSS. I will attempt to annotate all the important parts. The guide will begin slowly, but should speed up once a level of comfort has been reached.
Rather than starting a theme from scratch, and having to explain everything, I will instead focus on dissecting an existing theme and explaining parts as they are required. From a personal point of view, I find it easier to learn things by focussing on the small details, and ignoring everything else. In this instance I will be using the default WordPress 1.5 theme Kubrick.
Diagrams will be used where necessary, and annotated code will be available. The different stages will be available to download using the links in the menu on the right of each page.
The first part of this guide is split into two steps, and will result in a basic site with a minimum of style – it will be fully usable, if not particularly attractive. Future guides will dissect the theme further, and make it look more attractive.
Step 1: Pulling it apart
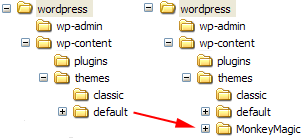
The first step is to make a copy of the default theme. All themes are found in the wp-content/themes directory. Here Ive simply copied the default theme and renamed it to MonkeyMagic:
Cleaning the theme
Now we need to clean the theme in order to make it our own. Every theme has a piece of information that tells WordPress what the theme is called, who wrote it, as well as containing other details such as version and description. This information is displayed by WordPress in the administration presentation section, and a theme will not work without it. The information is defined at the start of the file style.css. Its important that we dont get confused with the existing Kubrick style, so the best thing is to delete the style.css, and create a new one:
/*
Theme Name: MonkeyMagic
Theme URI: http://urbangiraffe.com/
Description: Theme dissection example
Version: 1.0
Author: John Godley
Author URI: http://urbangiraffe.com/
*/
Make sure you save this in the MonkeyMagic theme directory, and not the default one!
Removing Kubrick
Next we need to remove some Kubrick specific styles in the file header.php. Dont worry about the details here, its just necessary we lose all styles.
Delete from line 17 to 48 (inclusive).
<!DOCTYPE html PUBLIC "-//W3C//DTD XHTML 1.0 Transitional//EN" "http://www.w3.org/TR/xhtml1/DTD/xhtml1-transitional.dtd">
<html xmlns="http://www.w3.org/1999/xhtml">
<head profile="http://gmpg.org/xfn/11">
<meta http-equiv="Content-Type" content="<?php bloginfo('html_type'); ?>; charset=<?php bloginfo('charset'); ?>" />
<title><?php bloginfo('name'); ?> <?php if ( is_single() ) { ?> » Blog Archive <?php } ?> <?php wp_title(); ?></title>
<meta name="generator" content="WordPress <?php bloginfo('version'); ?>" /> <!-- leave this for stats -->
<link rel="stylesheet" href="<?php bloginfo('stylesheet_url'); ?>" type="text/css" media="screen" />
<link rel="alternate" type="application/rss+xml" title="RSS 2.0" href="<?php bloginfo('rss2_url'); ?>" />
<link rel="alternate" type="text/xml" title="RSS .92" href="<?php bloginfo('rss_url'); ?>" />
<link rel="alternate" type="application/atom+xml" title="Atom 0.3" href="<?php bloginfo('atom_url'); ?>" />
<link rel="pingback" href="<?php bloginfo('pingback_url'); ?>" />
<style type="text/css" media="screen">
/* BEGIN IMAGE CSS */
/* To accomodate differing install paths of WordPress, images are referred only here,
and not in the wp-layout.css file. If you prefer to use only CSS for colors and what
not, then go right ahead and delete the following lines, and the image files. */
body { background: url("<?php bloginfo('stylesheet_directory'); ?>/images/kubrickbgcolor.jpg"); } <?php /* Checks to see whether it needs a sidebar or not */ if ((! $withcomments) && (! is_single()) && (! is_page())) { ?>
#page { background: url("<?php bloginfo('stylesheet_directory'); ?>/images/kubrickbg.jpg") repeat-y top; border: none; } <?php } else { // No sidebar ?>
#page { background: url("<?php bloginfo('stylesheet_directory'); ?>/images/kubrickbgwide.jpg") repeat-y top; border: none; } <?php } ?>
#header { background: url("<?php bloginfo('stylesheet_directory'); ?>/images/kubrickheader.jpg") no-repeat bottom center; }
#footer { background: url("<?php bloginfo('stylesheet_directory'); ?>/images/kubrickfooter.jpg") no-repeat bottom; border: none;}
/* Because the template is slightly different, size-wise, with images, this needs to be set here
If you don't want to use the template's images, you can also delete the following two lines. */
#header { margin: 0 !important; margin: 0 0 0 1px; padding: 1px; height: 198px; width: 758px; }
#headerimg { margin: 7px 9px 0; height: 192px; width: 740px; }
/* END IMAGE CSS */
/* To ease the insertion of a personal header image, I have done it in such a way,
that you simply drop in an image called 'personalheader.jpg' into your /images/
directory. Dimensions should be at least 760px x 200px. Anything above that will
get cropped off of the image. */
/*
#headerimg { background: url('<?php bloginfo('stylesheet_directory'); ?>/images/personalheader.jpg') no-repeat top;}
*/
</style>
<?php wp_get_archives('type=monthly&format=link'); ?>
<?php wp_head(); ?>
</head>
<body>
<div id="page">
<div id="header">
<div id="headerimg">
<h1><a href="<?php echo get_settings('home'); ?>"><?php bloginfo('name'); ?></a></h1>
<div class="description"><?php bloginfo('description'); ?></div>
</div>
</div>
<hr />
Awesome resource! Just invaluable! Thanks so much for sharing it!
Not sure if anybody else had to do this, but to clear the style completely, I had to remove the at the end of the header.php file otherwise you would get rendered borders. this happened in safari 4.0.1 and firefox… whatever version I have installed. I don’t know, I never use it.
putting it back in, the break comes back but without the strange borders on either side. Don’t know why it was happening in the first place. Thanks a bunch for such a great tutorial.
Hi jonh,
i tried to do part 1 but if i notice a fault that i’m gonna to talking about.
In Italian version of this guide at the bottom of each page , there is your two MonkeyMoney : one with style and other without.
So i uploaded your themes and i turn one with no-style, i clear style.css leaving only “header” you suggest to add to style.css( not style at all… ), and i copy header of theme from these page where i’m posting and i add it to MonkeyMoney witout style.
So, even i clear-up every style from header.php, if i mantein header.php in the theme, layout is not the same displayed here : stage1finalthumb.png; but eliminating header.php layout is displayd in a right way…
In my opinion this is not explain clearly.
Regards
Not sure if anybody else had to do this, but to clear the style completely, I had to remove the at the end of the header.php file otherwise you would get rendered borders. this happened in safari 4.0.1 and firefox… whatever version I have installed. I don’t know, I never use it.
this is the most straight forward and clearest guide word wordpress beginners i’ve so far seen. thanks.
this is a great help thanks! I’m using Lubith to generate my themes which is a lot easier and faster than starting from scratch but I will use this information to manipulate the code behind and get the best results. thanks again